A cantilever snap clicks home on the very first try in CAD, every time, with no force and no fatigue — CAD does not have a yield point. The real part does, and the difference between a snap that survives 500 battery-door cycles and one that cracks on the fifth is almost never the click; it is the strain at the beam root the instant the hook is fully deflected. That strain is a number you can compute in one line before any steel is cut, and the whole art of a durable snap is keeping it well under the resin’s limit.
The geometry: what a cantilever snap actually is
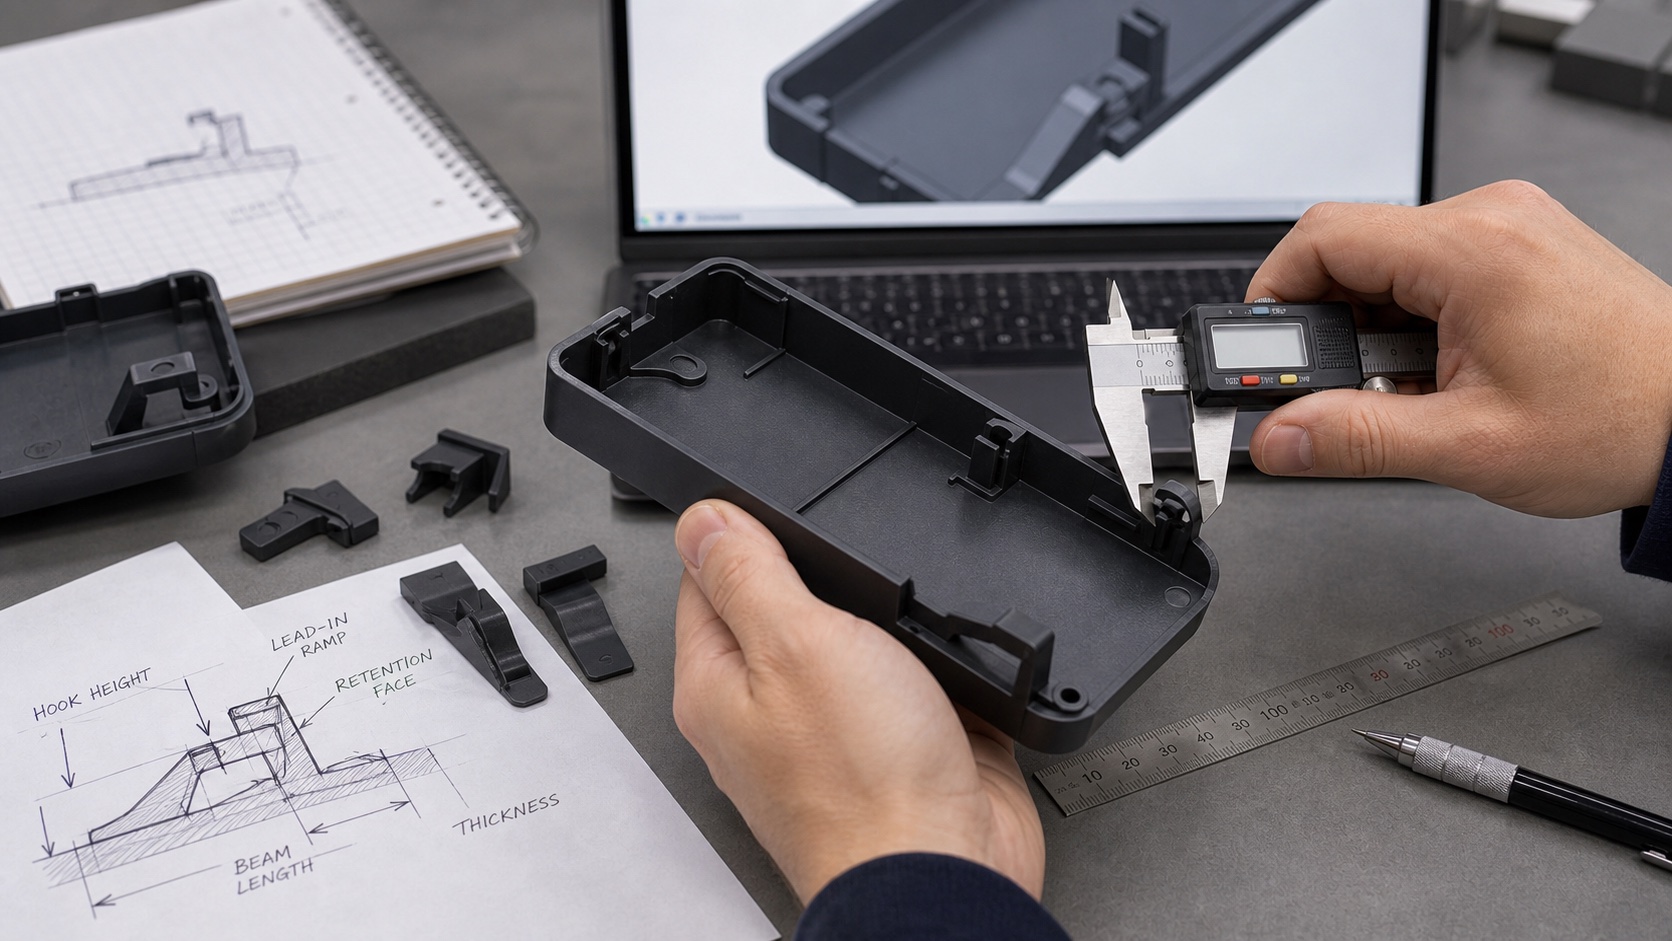
A cantilever snap-fit is a short beam fixed at one end (the root, where it joins the wall) and free at the other, with a hook near the tip that catches a mating lip. To assemble, the hook rides up a ramp, the beam deflects, the hook clears the lip, and the beam springs back to lock. Four numbers govern its life:
- Beam length L — working length from root to where the hook engages.
- Root thickness t — thickness at the fixed end, in the bending plane. The single most punishing variable.
- Deflection Y — how far the tip moves sideways for the hook to clear the lip. This equals the hook’s overhang (engagement depth), not some arbitrary travel.
- The two face angles — the lead-in (insertion) angle the hook climbs during assembly, and the retention angle on the locking side that resists pull-out.
The mental model that matters: the beam is a spring, and Y is how far you stretch it every time the part is opened. Stretch a spring a little, forever; stretch it almost to breaking, only a few times. A permanent snap deflects once, at assembly. A battery door deflects on every change — hundreds or thousands of cycles — and must be designed to a completely different rule, even if the geometry looks identical in CAD.
Strain at the root: the one equation that decides everything
For a straight, constant-section cantilever deflected by Y at its free end, the peak bending strain — which occurs at the outer fiber of the root, because that is where bending moment is highest — is:
ε = (1.5 × t × Y) ÷ L²
Read what the algebra says. Strain rises linearly with root thickness t and deflection Y, but falls with the square of length L — and that square is the whole game. Longer and thinner beams carry the same deflection at dramatically lower strain: doubling the length cuts strain to a quarter; halving the thickness halves it. A stubby, chunky beam is a crack waiting for a customer, and you cannot tune it out with material choice — you fix it with geometry. (The formula assumes modest deflection and a constant section; for real-snap proportions it is accurate enough to design with, and every major resin supplier’s guide publishes it.)
Allowable strain by resin — and why glass fill is a trap
Every thermoplastic has a strain it can reach once without yielding, and a much lower strain it can reach repeatedly without fatiguing. The ductile, unfilled engineering resins are the snap-fit workhorses precisely because they bend without snapping:
- ABS — the default housing resin. One-time strain around 2%. Forgiving, easy to mold, cheap.
- PC (polycarbonate) — tough and ductile, one-time strain 2–4%; PC/ABS blends sit between the two.
- PP (polypropylene) — the living-hinge champion. Very high strain capability (one-time 6–8%+) and excellent fatigue resistance, the natural choice for snaps that flex thousands of times. Soft and creep-prone, so it holds less retention force.
- Nylon (PA, unfilled) — ductile, one-time strain 4–6%, but it absorbs moisture and shifts with humidity, so derate.
Now the trap. Glass-filled grades (PA-GF, PBT-GF, ABS-GF) are stiffer and stronger, and far more brittle. The fibers that buy you stiffness destroy the elongation: a 30% glass-filled nylon may tolerate well under 1% strain before the surface fibers start cracking the matrix. A material that is excellent for a rigid structural bracket is a poor choice for a feature whose entire job is to flex. If a snap must live on a glass-filled part, make the snap a separate unfilled component, or lengthen the beam so aggressively to clear the brittle limit that it often no longer fits. Pick a ductile resin for anything that bends repeatedly, and treat “glass-filled snap-fit” as a phrase that should make you nervous.
One-time vs repeated-use: the 500-cycles-not-5 rule
This is the heart of it. You design the two kinds of snap to two different fractions of the resin’s capability:
- Permanent (snap once, stay forever): a clip assembled on the line and never meant to come apart. You may design near the one-time allowable strain — say 80–90% of it — because the beam sees that strain only once, at insertion. The retention face is steep (near 90°) so it cannot back out.
- Serviceable (repeated-use): a battery door, a filter cover, an SD-card hatch — anything opened again and again. Now fatigue, not yield, is the enemy. Design to a small fraction of the one-time limit, on the order of 30–50% (lower for high cycle counts), so the beam lives in the recoverable part of the stress curve, nowhere near the edge.
Get these backwards and you get the failure in the title. A beam at ABS’s 2% one-time limit is fine deflected once. Put it in a battery door, asked to hit 2% on every cell swap, and it crazes, whitens, and cracks — not at cycle 500 but around 5 to 50, because polymers fatigue and 2% is the cliff edge. The fix is not a stronger material; it is a longer or thinner beam that turns 2% into 0.8%, so the door opens for two years without complaint.
A worked example: the 2.25% snap that cracks
Take a plausible clip drawn without thinking about strain:
- Root thickness t = 1.5 mm (matching a 1.5 mm wall — convenient, so it gets used).
- Beam length L = 10 mm.
- Hook engagement Y = 1.0 mm (a solid, secure-feeling catch).
Compute the root strain:
ε = (1.5 × 1.5 × 1.0) ÷ 10² = 2.25 ÷ 100 = 0.0225 = 2.25%
That is at or above ABS’s one-time limit. As a permanent clip it is already living dangerously — one cold day, one thick shot, one sharp corner and it cracks on the line. As a repeated-use snap it is a guaranteed warranty return: it hits its maximum strain on every cycle, with zero fatigue margin. This is the snap that clicks beautifully in CAD and dies in the customer’s hand on the tenth battery change.
Fix 1 — lengthen the beam. Keep t and Y; stretch L from 10 mm to 14 mm:
ε = (1.5 × 1.5 × 1.0) ÷ 14² = 2.25 ÷ 196 = 0.0115 ≈ 1.15%
Strain nearly halved for a 40% longer beam — the L² term working for you. At ~1.15% the clip sits around half of ABS’s one-time limit: comfortable for a permanent snap, acceptable for a light-duty serviceable one. For a true high-cycle door, push to L = 17 mm: ε = 2.25 ÷ 289 ≈ 0.78%, roughly 40% of the limit. Now you are designing for 500 cycles, not 5.
Fix 2 — thin the root, or taper the beam. If you cannot find 14 mm of length, drop the root to t = 1.0 mm at the original L = 10 mm: ε = (1.5 × 1.0 × 1.0) ÷ 100 = 1.5%. Better still, taper the beam (next section) for the same relief without losing as much root stiffness.
The tapered (constant-stress) beam
A constant-section cantilever wastes material: only the root is at peak strain, while the tip is barely stressed. A tapered beam — thicker at the root, thinner toward the tip — spreads the bending strain along its length, so no single point hits the peak the straight beam sees. Taper the thickness so the tip is about half the root thickness, and for the same deflection the peak strain drops to roughly 0.6× the constant-section value — equivalently, you can deflect it about 1.6× further at the same strain.
On the example: the straight 10 mm beam at 2.25%, tapered to half-thickness at the tip, drops to about 2.25% × 0.6 ≈ 1.35% — nearly the benefit of lengthening to 14 mm, in the same footprint. Tapering width instead of thickness works too and is sometimes easier to mold. When space is tight and the snap must cycle, the tapered beam is the most elegant lever you have.
Insertion vs retention angle, and the forces they set
The two faces of the hook do opposite jobs and want opposite geometry. Each is a wedge converting the beam’s spring force into the push you feel on assembly or the pull it takes to release:
- Lead-in / insertion angle (the ramp): the face the hook climbs during assembly. Keep it shallow — around 25–30° — so the part goes together with a firm but reasonable push. Too steep a lead-in spikes the assembly force and tempts people to slam parts together.
- Retention angle (the locking face): resists pull-out, and where permanent and serviceable diverge. For a permanent snap, go steep — 80–90°, effectively a square shelf — so the only way out is to break the beam. For a removable snap, use a gentler 40–50°, so a deliberate pull deflects the beam and releases it — the door opens by design, not by force.
There is a tension here: the same changes that lower strain (longer, thinner beam) also lower the spring force, so a beam optimized purely for low strain can feel flimsy and hold weakly. Tune in order — get strain safe first, then recover holding force through the retention angle, the hook overhang, and the beam width. Width is the free lever: it adds force without touching the bending strain, which depends on thickness.

The root fillet: the stress riser that does the killing
Here is the detail that fails more snaps than any equation. The strain formula assumes a clean beam, but failure starts at the inside corner where the beam meets the wall. A sharp inner corner is a stress concentrator — local strain there can be two or three times the nominal value the formula predicts, because stress crowds into a zero-radius corner. That is where the crack initiates, every time.
The fix is nearly free and nearly always omitted: add a fillet at the root, radius roughly 0.5× the beam thickness (about 0.5–0.75 mm on a 1.0–1.5 mm beam). It spreads the load over a curve instead of a point and cuts the peak local strain dramatically. Do not over-fillet — too large a radius shortens the working length and thickens the root, quietly raising nominal strain. If a snap is cracking right at the wall, the inner corner is the first suspect, before you touch L or t.
Draft and moldability
A snap hook is, by definition, an undercut — the barb hooks back against the pull direction, so it cannot lift off the core. The beam faces still need draft so the feature releases cleanly, and the hook itself usually needs a moving piece of steel — a slider or lifter — or a pass-through / shut-off, where the opposing mold half forms the underside of the hook through a window in the wall. The pass-through is the cheap, robust option worth designing toward. Decide this early, because “add a snap here” can quietly mean “add a slider here” — a real line on the tooling quote.
Common mistakes and failure modes
- The short, stubby beam. The most common killer. A thick, short cantilever drives strain through the roof (it goes as t÷L²). It feels sturdy in the hand and cracks in service. Lengthen and thin it.
- A sharp inner corner at the root. Zero-radius corner = stress riser = crack initiation site. Add a fillet ~0.5× thickness. This single omission accounts for a huge share of field cracks.
- Designing a repeated-use snap to the one-time limit. The literal 500-cycles-not-5 error. A door at 2% strain in ABS fatigues out in dozens of cycles. Serviceable snaps belong at 30–50% of the limit, not 100%.
- No lead-in. A hook with no ramp forces brutal assembly — parts get slammed, beams over-deflect, hooks shear. Give it a 25–30° lead-in.
- Glass-filled resin for a flexing feature. Stiff and strong, but brittle — often under 1% allowable strain. Wrong material for anything whose job is to bend. Use a ductile, unfilled resin.
- Ignoring fatigue entirely. Designing only against first-cycle yield and never asking how many times the snap will move. Cycle count is a spec; treat it like one.
- An undercut with no plan to form it. A snap drawn without thinking about how the hook releases — no draft on the beam faces, no shut-off, no slider budgeted — becomes a tooling surprise or a part that drags and scuffs on every ejection.
Quick-reference: allowable strain by resin
Approximate working strains for cantilever snaps. Treat these as design starting points and confirm against the specific grade’s datasheet — fillers, moisture, and temperature all move them.
| Resin | One-time max strain (permanent snap) | Repeated-use design strain (serviceable) | Notes |
|---|---|---|---|
| ABS | ≈2% | ≈0.6–1% | Default housing resin; ductile, easy to mold. |
| PC / PC-ABS | ≈2–4% | ≈1–1.5% | Tough; good for higher-duty snaps. |
| PP (polypropylene) | ≈6–8%+ | ≈2–3% | Best fatigue life; the living-hinge / many-cycle choice. |
| Nylon (PA, unfilled) | ≈4–6% | ≈1.5–2% | Ductile but moisture-sensitive — derate when humid. |
| Glass-filled (PA-GF, PBT-GF, 30%) | <1% | avoid | Brittle; poor choice for a flexing snap. |
A pre-tooling snap-fit checklist
- Compute ε = 1.5·t·Y ÷ L² for every snap, with Y set to the real hook overhang — not a guess.
- Know the duty: permanent (design near the one-time limit) or serviceable (design to 30–50% of it). Write the target cycle count down.
- Pick a ductile resin sized to that strain; never put a flexing snap on a glass-filled grade.
- Favor long and thin over short and thick — the L² term is your biggest lever — and taper the beam when space is tight.
- Lead-in 25–30°; retention 80–90° for permanent, 40–50° for removable.
- Fillet the root at ~0.5× thickness — the cheapest crack-prevention on the part.
- Recover holding force with width, not by thickening the root.
- Plan how the hook releases — shut-off pass-through where possible, slider/lifter budgeted where not, draft either way.
A snap-fit lives or dies on the strain at its root: compute ε = 1.5·t·Y ÷ L², keep a permanent clip below the resin’s one-time limit and a serviceable one to a third of it, fillet the inner corner, and go long-and-thin — that is the difference between 500 cycles and 5.